
EBB AND FLOW BUILD GUIDE
EASY STEP-BY-STEP GUIDE TO BUILDING YOUR OWN FLOOD & DRAIN HYDROPONICS SETUP
Growing plants with a flood and drain (also called ebb and flow) hydroponic system is one of the most efficient ways to achieve fast, healthy growth. This method provides your plants with direct access to oxygen and nutrients while automating the watering process, reducing the need for constant maintenance. Whether you're a beginner or an experienced grower looking to upgrade your setup, this guide will walk you through the steps to build your own flood and drain system.
Why Choose a Flood and Drain System?
A flood and drain system works by periodically flooding a grow tray with nutrient-rich water before draining it back into a reservoir. This cycle ensures that plant roots get the perfect balance of moisture and oxygen, promoting faster growth and reducing the risk of overwatering or underwatering.
Some of the benefits of using this system include:
Efficient Nutrient Delivery: Roots receive fresh oxygen and nutrients with every flood cycle.
Water Conservation: Unlike traditional soil growing, this method recycles water, making it more sustainable.
Less Maintenance: Automated watering reduces the need for constant monitoring.
Scalability: It can be used for small or large grows with minimal modifications.
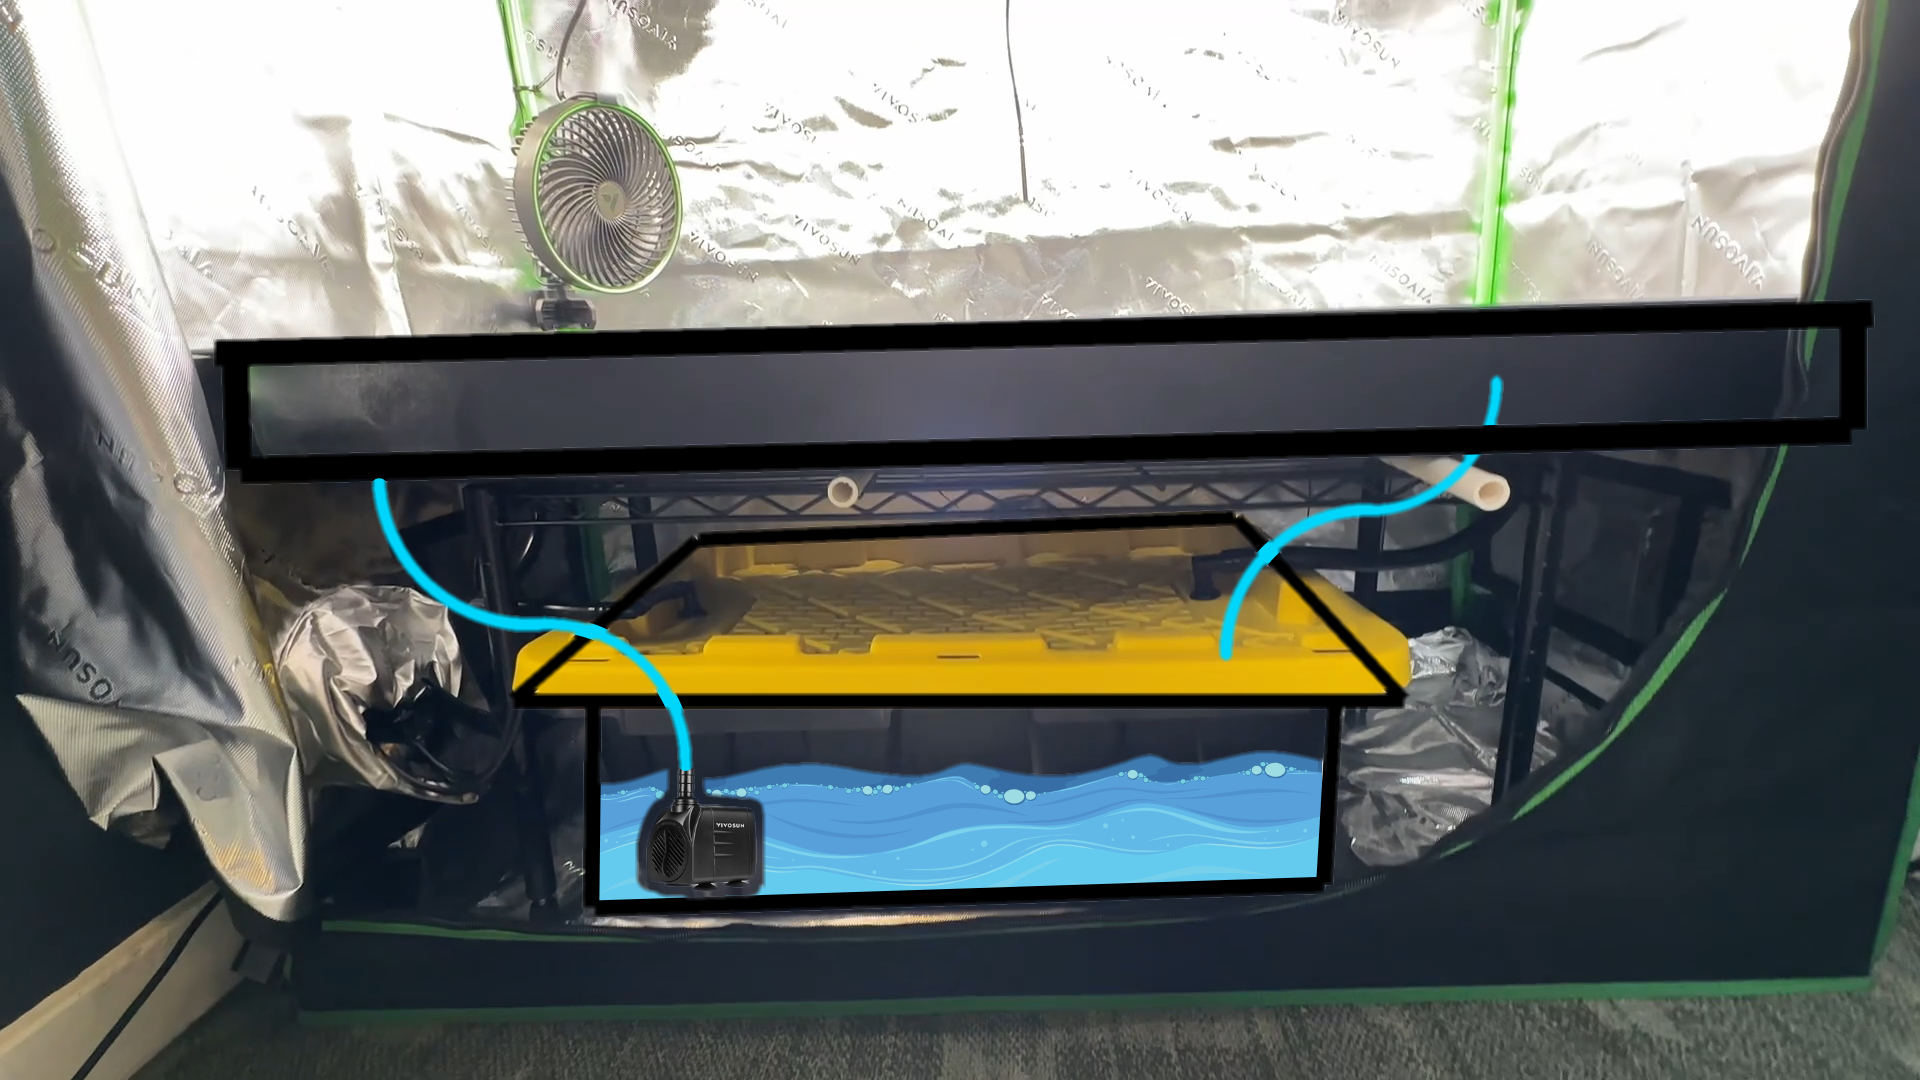
This is my flood and drain (ebb and flow) hydroponic setup inside a 2x4 grow tent using a 14-gallon reservoir. I designed this system for simplicity, reliability, and adjustability. If you're setting up a similar system, this guide will walk you through everything you need to know, including how to avoid common mistakes and maximize efficiency.
Why Use a Pre-Made Flood Tray?
Using a pre-made flood tray (instead of a DIY container) has several benefits:
✔ Even Water Distribution – Designed for hydroponic use, it ensures water flows evenly to all plants.
✔ Built-in Drainage Points – Pre-drilled holes allow easy installation of flood and drain fittings.
✔ Durable and Leak-Proof – Stronger plastic prevents cracks, leaks, and warping over time.
✔ Easier to Clean – Smooth surfaces make it simple to remove algae or nutrient buildup.
However, most pre-made flood trays do not come with pre-drilled holes for the flood and drain fittings. I'll explain the best placement for drilling your own below.
Tools & Materials Needed
Main Components
✔ 14-Gallon Plastic Tote (Reservoir) – Holds the nutrient solution under the table.
✔ Metal Wire Table (Adjustable Riser) – Supports the tray while allowing drainage.
✔ Pre-Made Flood Tray – Sized to fit the grow tent (mine is 2x4 feet).
✔ Submersible Water Pump (250-400 GPH) – Pushes water into the tray.
✔ Programmable Timer – Automates flood cycles.
✔ Flood and Drain Valves (with Bulkheads & Grommets) – Controls water flow in and out of the tray.
✔ Dark Tubing (Sized to Match the Valves) – Prevents light exposure and algae growth.
Side Components & Fittings
✔ 90° Elbows – Prevents kinks in hoses and allows tubing to pass through the reservoir lid.
✔ Grommets – Creates a watertight seal where hoses enter/exit the reservoir.
✔ Short PVC Pipes – Stabilizes the flood tray by making up for raised sections and extending the width.
✔ Airstone & Air Pump – Oxygenates the nutrient solution to prevent root rot.
Tools Needed
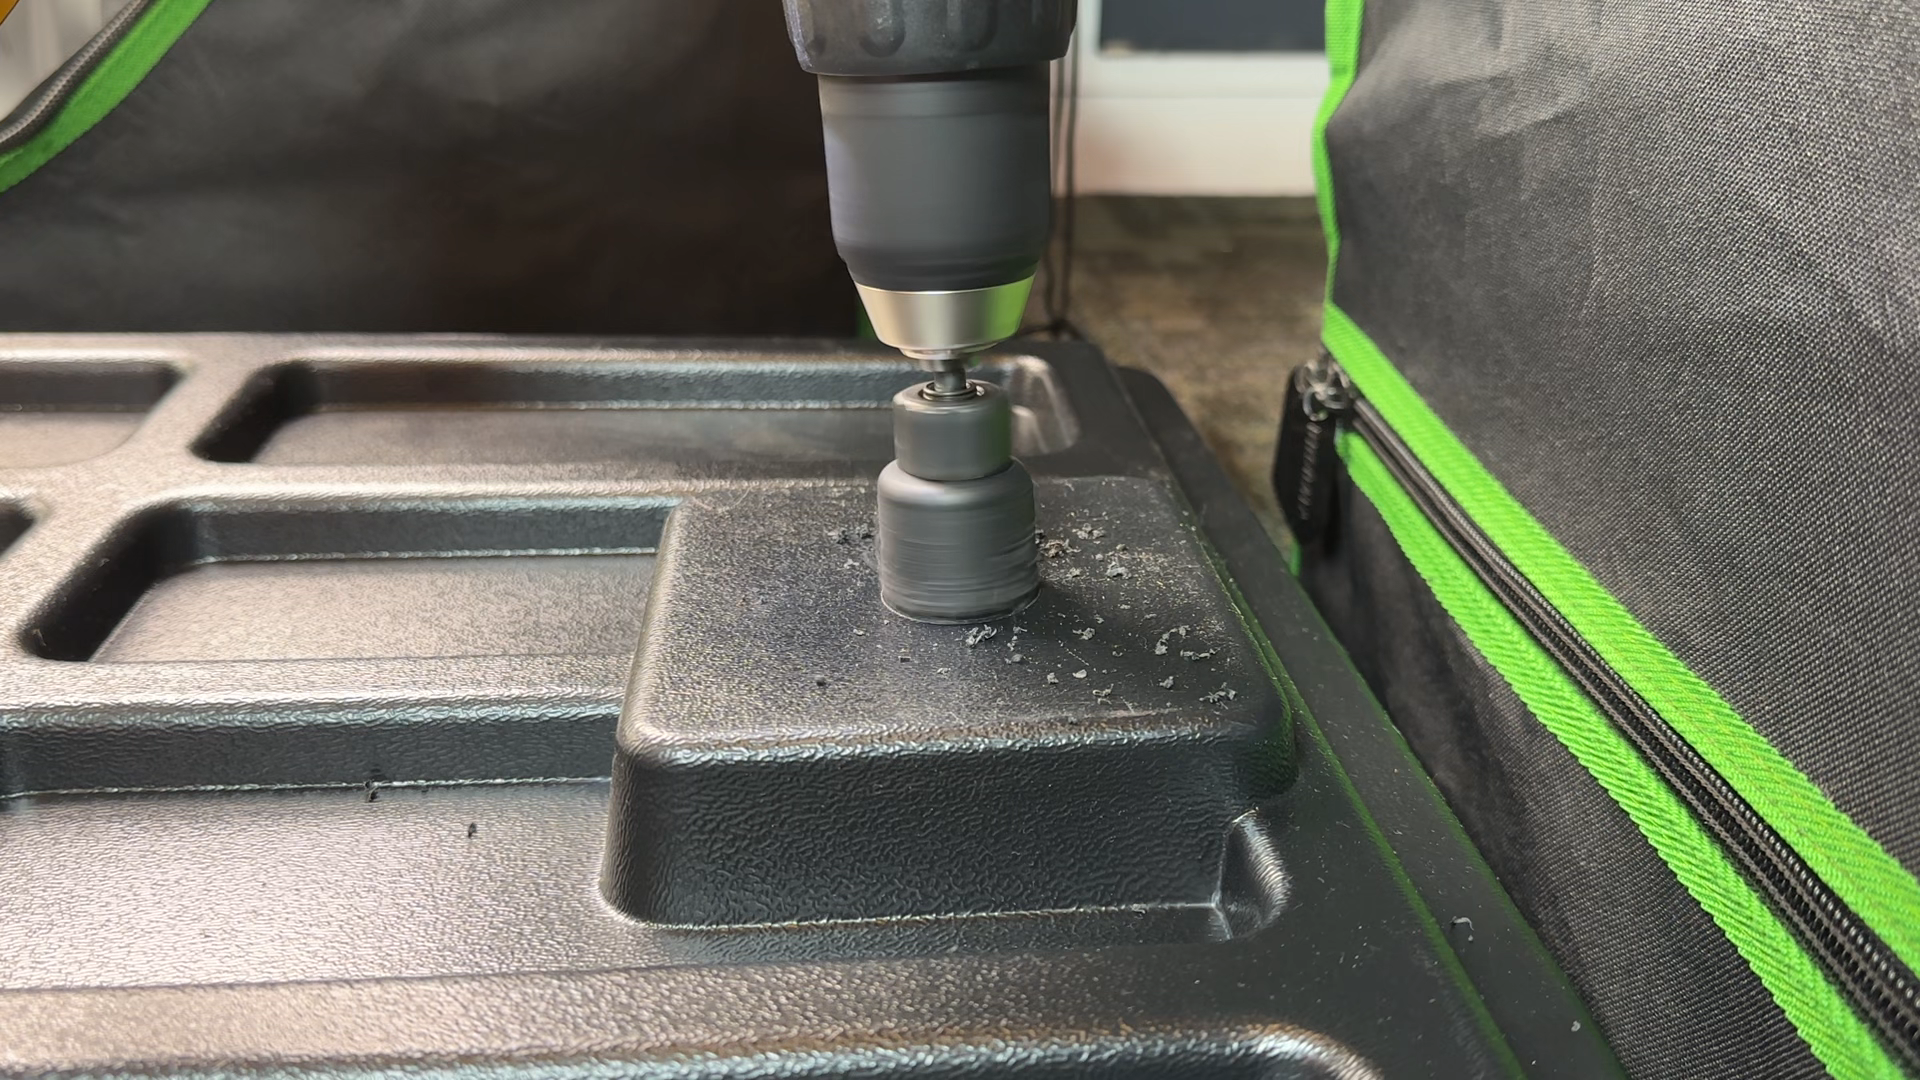
🛠 Drill & Hole Saw Bit (¾” or 1”) – For drilling valve holes in the flood tray and grommet holes in the reservoir lid.
🛠 Scissors or Tubing Cutter – For cutting hoses to length.
🛠 Zip Ties (Optional) – To keep hoses organized.


AMAZON LINKS


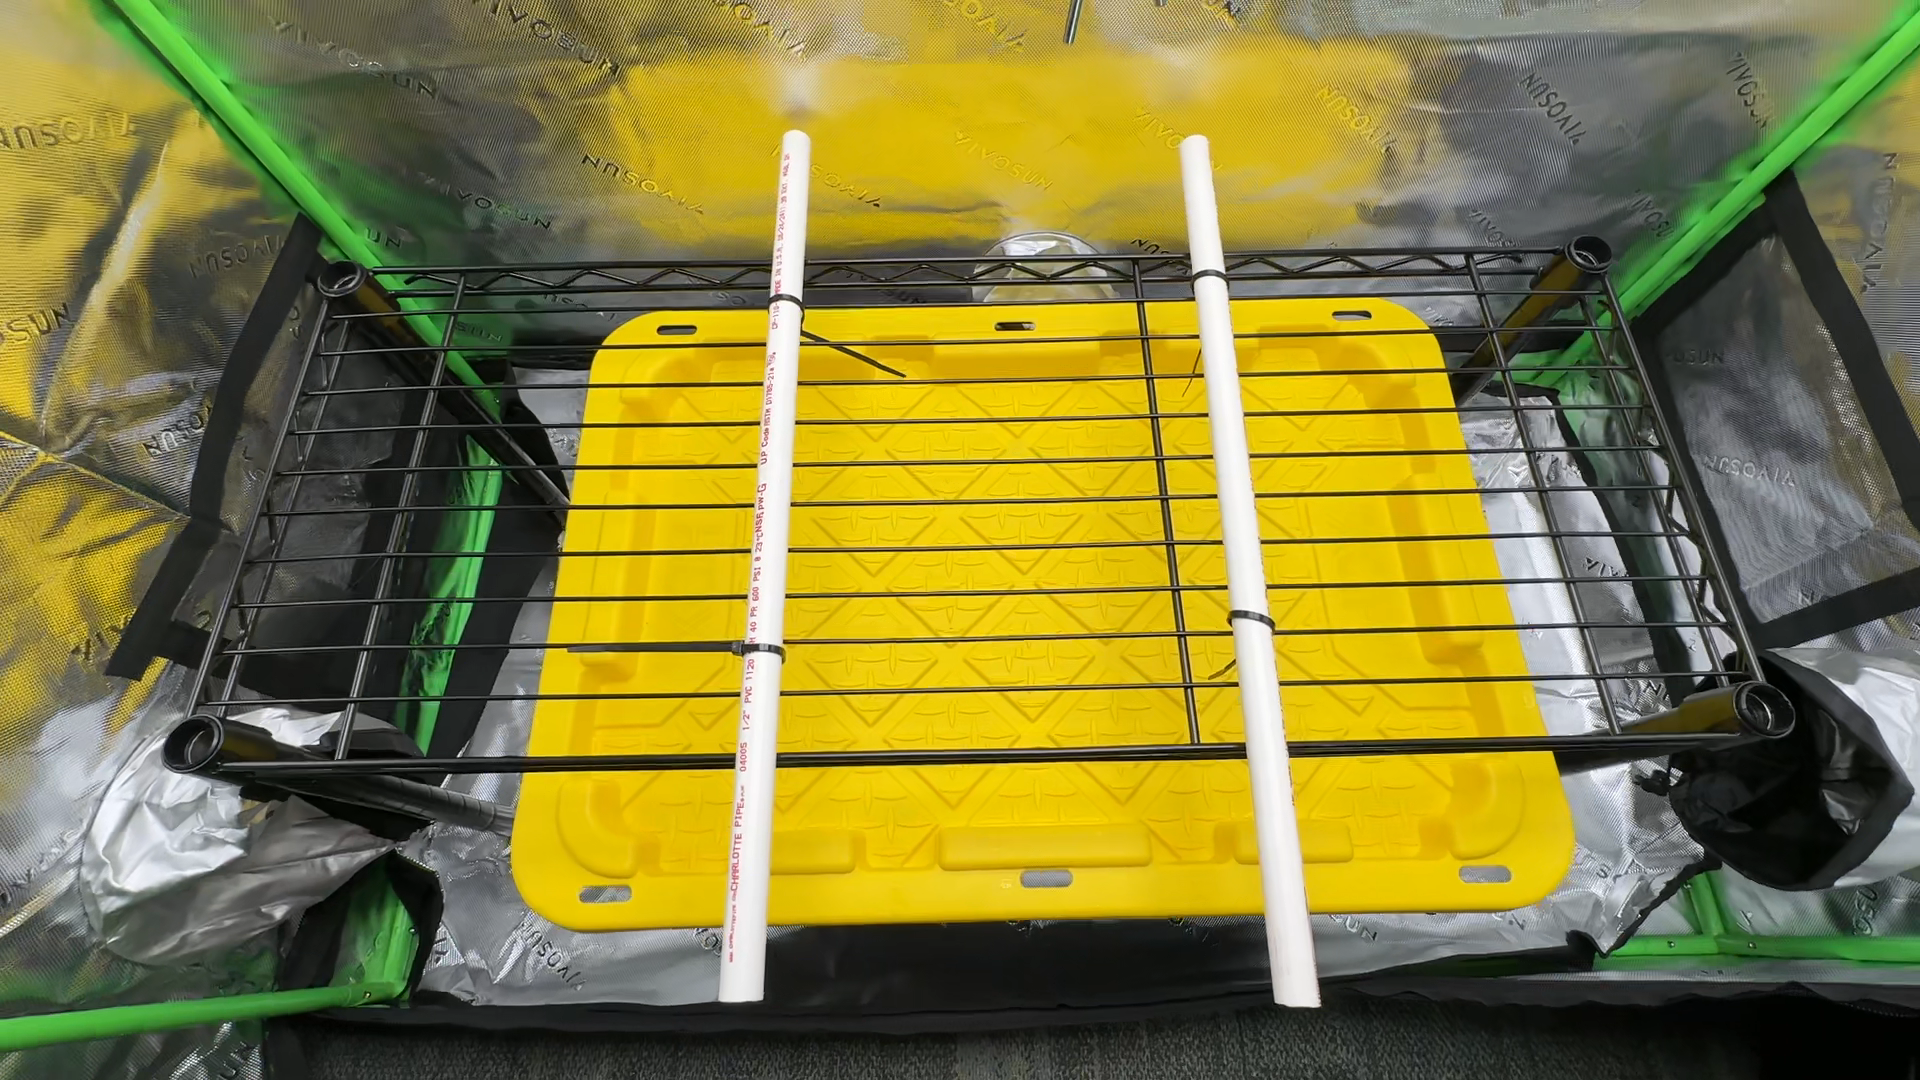
Step 1: Position the Reservoir and Table
1️⃣ Place the 14-gallon tote (reservoir) inside the grow tent under the flood tray.
The reservoir should fit completely under the adjustable metal wire table to allow easy drainage.
Make sure it's positioned for easy access when checking nutrients.
2️⃣ Set up the adjustable metal wire table above the reservoir.
The legs are adjustable, so no shims are needed to level the table.
Make sure the flood tray sits flat and stable.
3️⃣ Attach short PVC pipes to the flood tray to stabilize it (if needed).
Some flood trays have raised portions underneath that make them wobbly.
Cutting short pieces of PVC pipe and attaching them underneath helps extend the width and keep the tray level on the table.
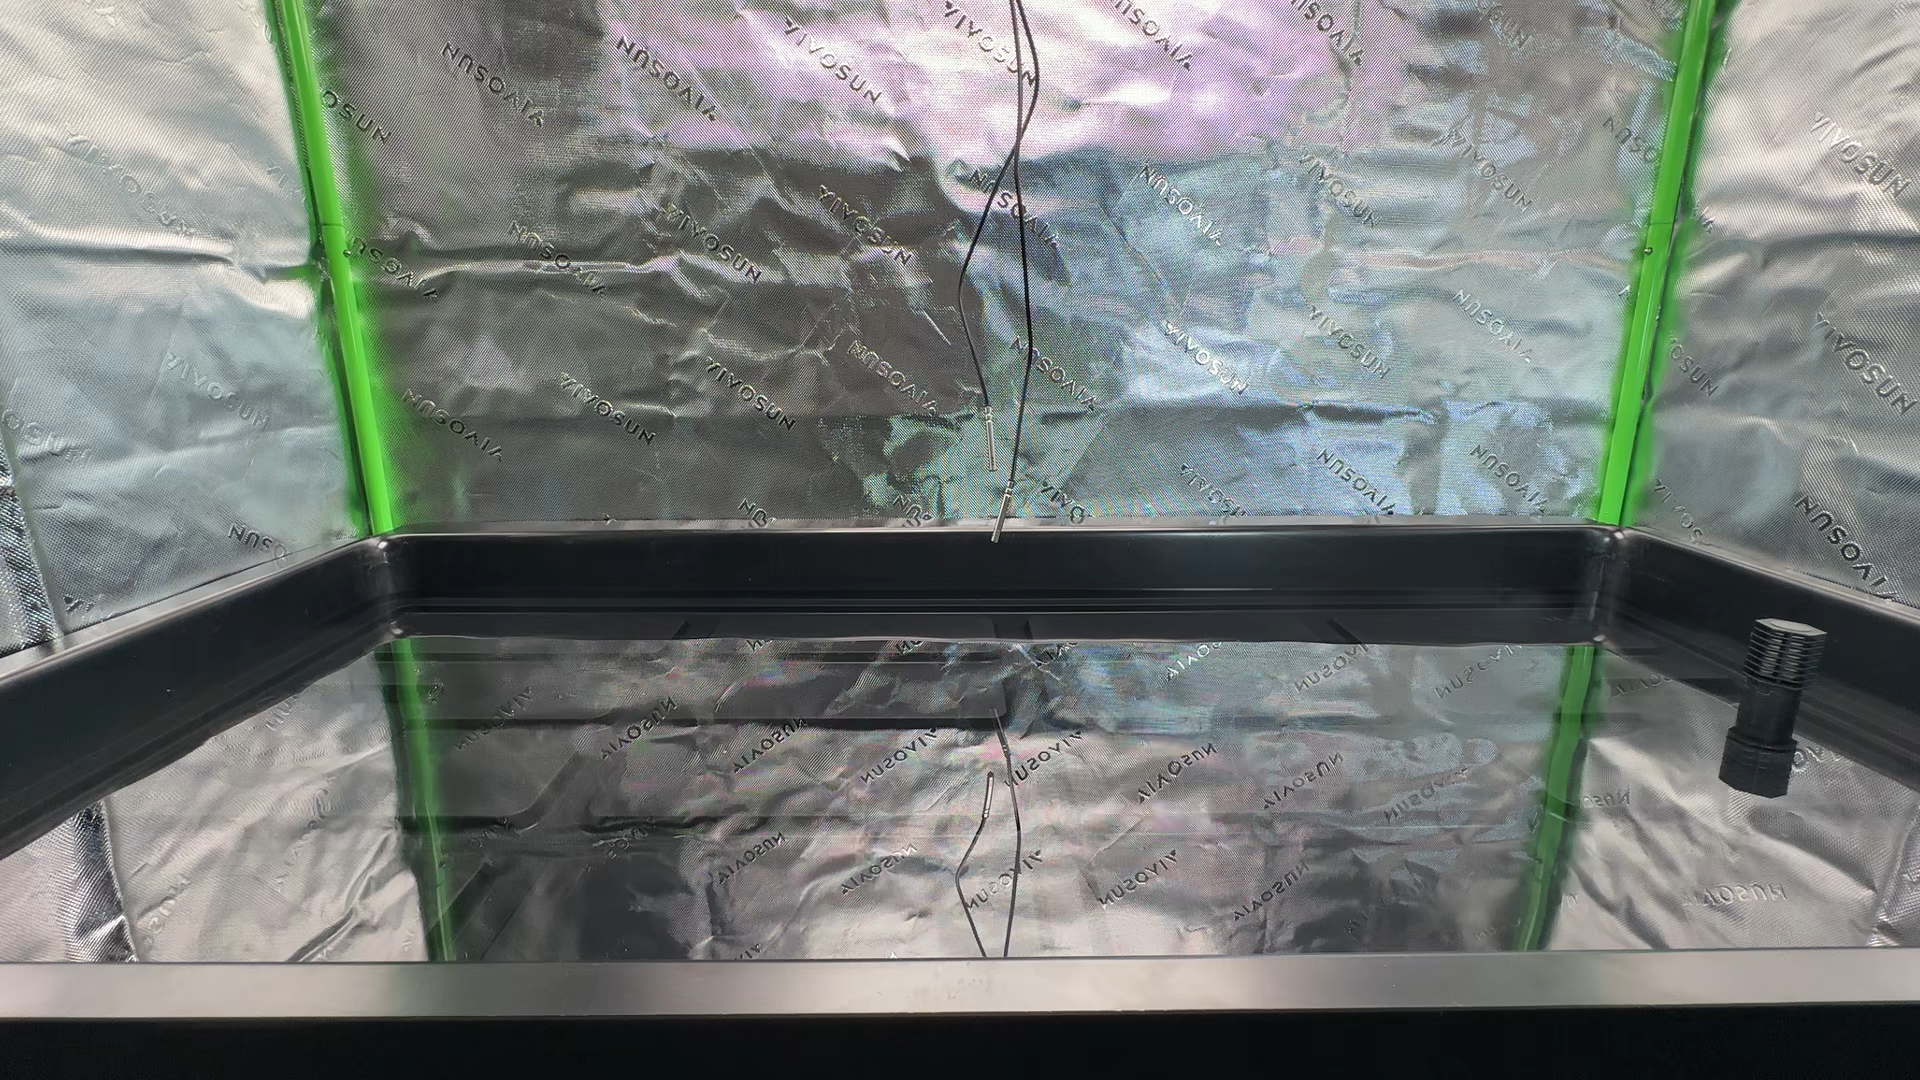
Step 2: Drill and Install the Flood and Drain Valves
1️⃣ Drill holes for the flood and drain valves in the flood tray.
Since most pre-made flood trays do not come with holes, you'll need to drill them yourself.
The best placement is on one end of the tray, in the lowest place possible (most flood tables will have an obvious ‘drain’ area.
Drill holes on opposite ends of the flood tray to control flood depth:
Flood Valve – This is where water is pumped into the tray from the reservoir.
Drain Valve – This controls maximum water height and allows excess solution to drain back (determined by how high you stack the drain valve pieces.
2️⃣ Install the flood and drain valves.
Insert each valve through its hole and hand-tighten the bulkhead and rubber grommet.
No wrench is needed – overtightening can damage the fittings.
Check that both are snug and watertight before proceeding.
Make sure the top of the drain valve is below the top of the flood tray (to prevent overflowing)
Drill holes in the lowest part of the tray for great drainage

Only hand tightening is needed here, but tighten it good
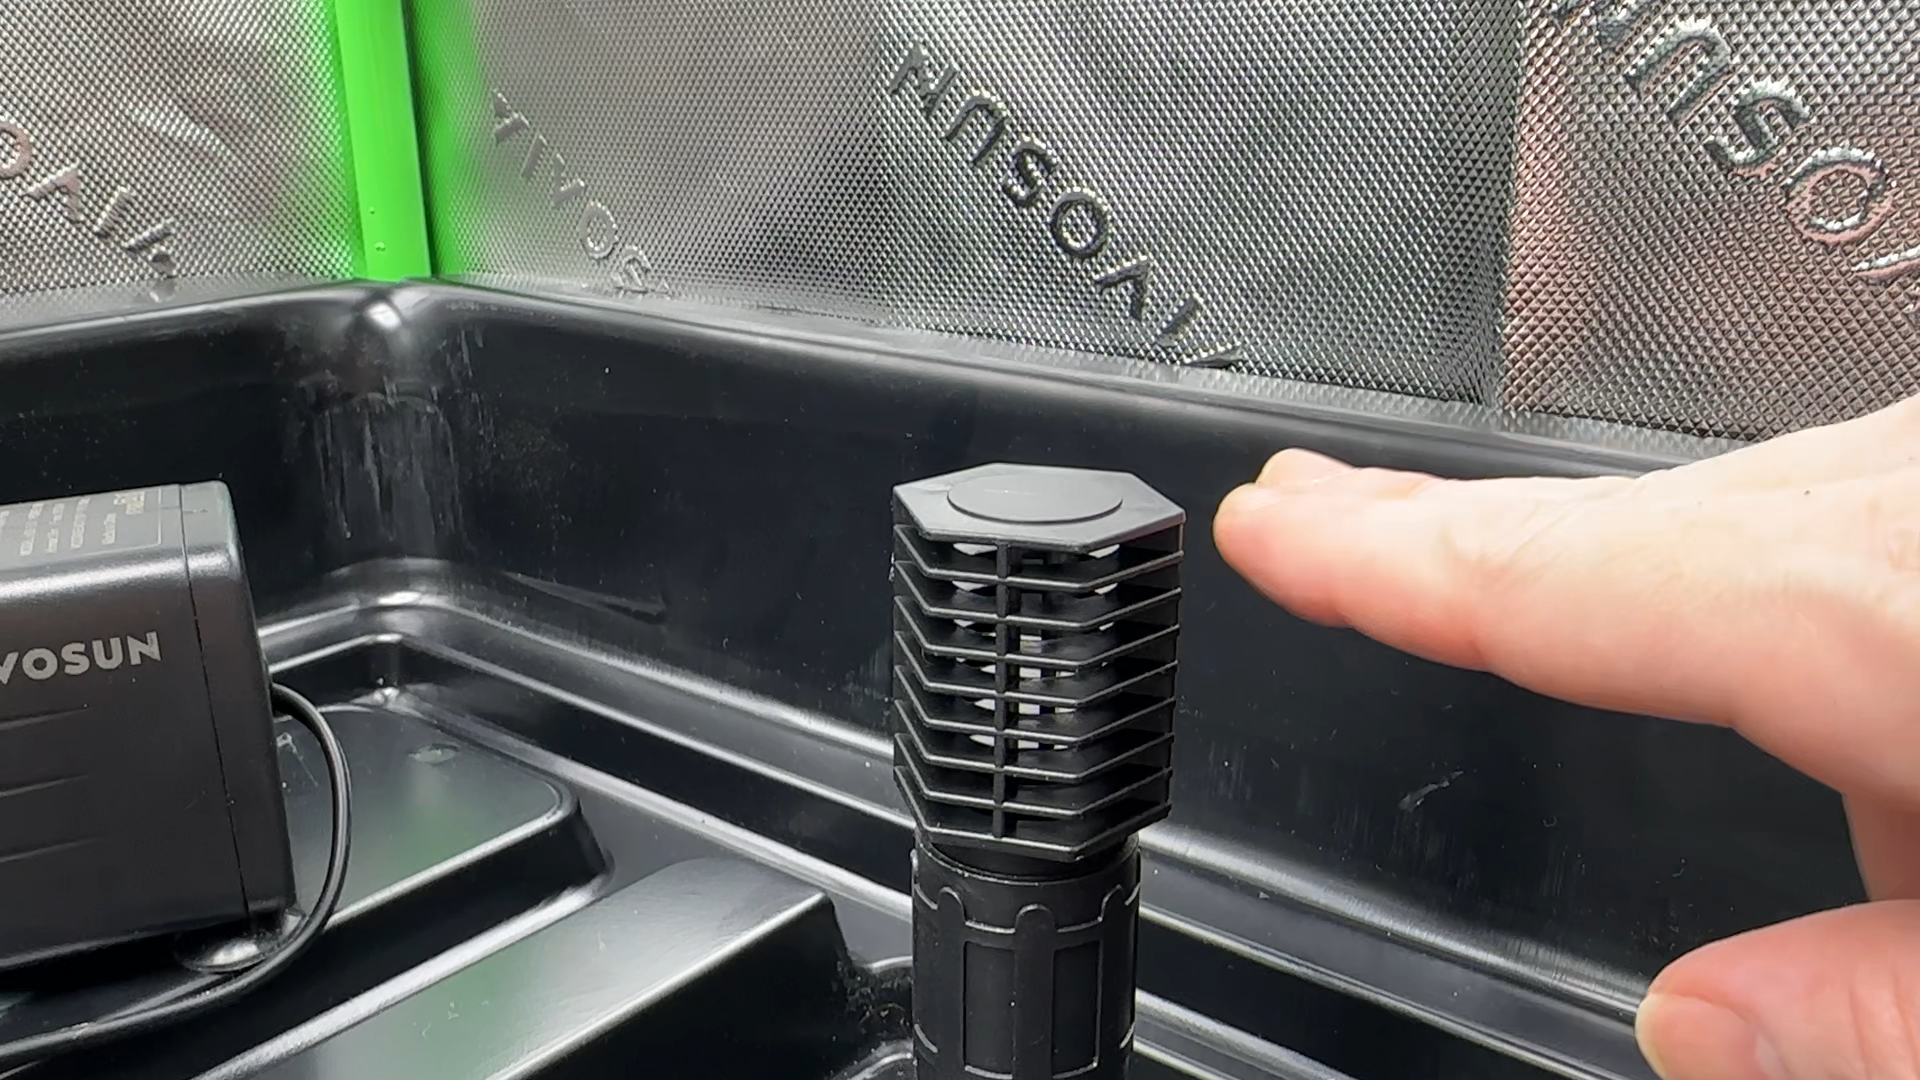
Make sure the drain valve isn’t higher than the top of the table
Step 3: Set Up the Water Pump and Tubing
1️⃣ Place the submersible pump inside the reservoir.
Position it on ‘fill’ side of the tote to allow proper circulation.
Connect dark tubing to the outlet of the pump.
2️⃣ Run the tubing from the pump to the flood valve.
Cut the tubing to the correct length so there’s no excess slack.
The tubing fits directly onto the valves, no zip ties are needed.
3️⃣ Set up the drain tubing.
The tubing from the drain valve does not connect to a grommet – it passes through a 90° elbow fitted into the reservoir lid.
This allows smooth water return without pressure buildup.
Step 4: Install the Airstone for Oxygenation
1️⃣ Drill a small hole in the reservoir lid for the airline tubing.
This keeps the air pump outside the tent while feeding the airstone inside.
2️⃣ Place an airstone inside the reservoir.
Position it opposite the water pump to evenly distribute oxygen.
3️⃣ Connect the airline tubing to the air pump.
Use a check valve if the air pump is below the water level to prevent backflow.
4️⃣ Turn on the air pump and check for strong bubbling.
The goal is constant aeration to keep oxygen levels high.
The pump goes on the ‘fill’ side, and will always stay submerged under water
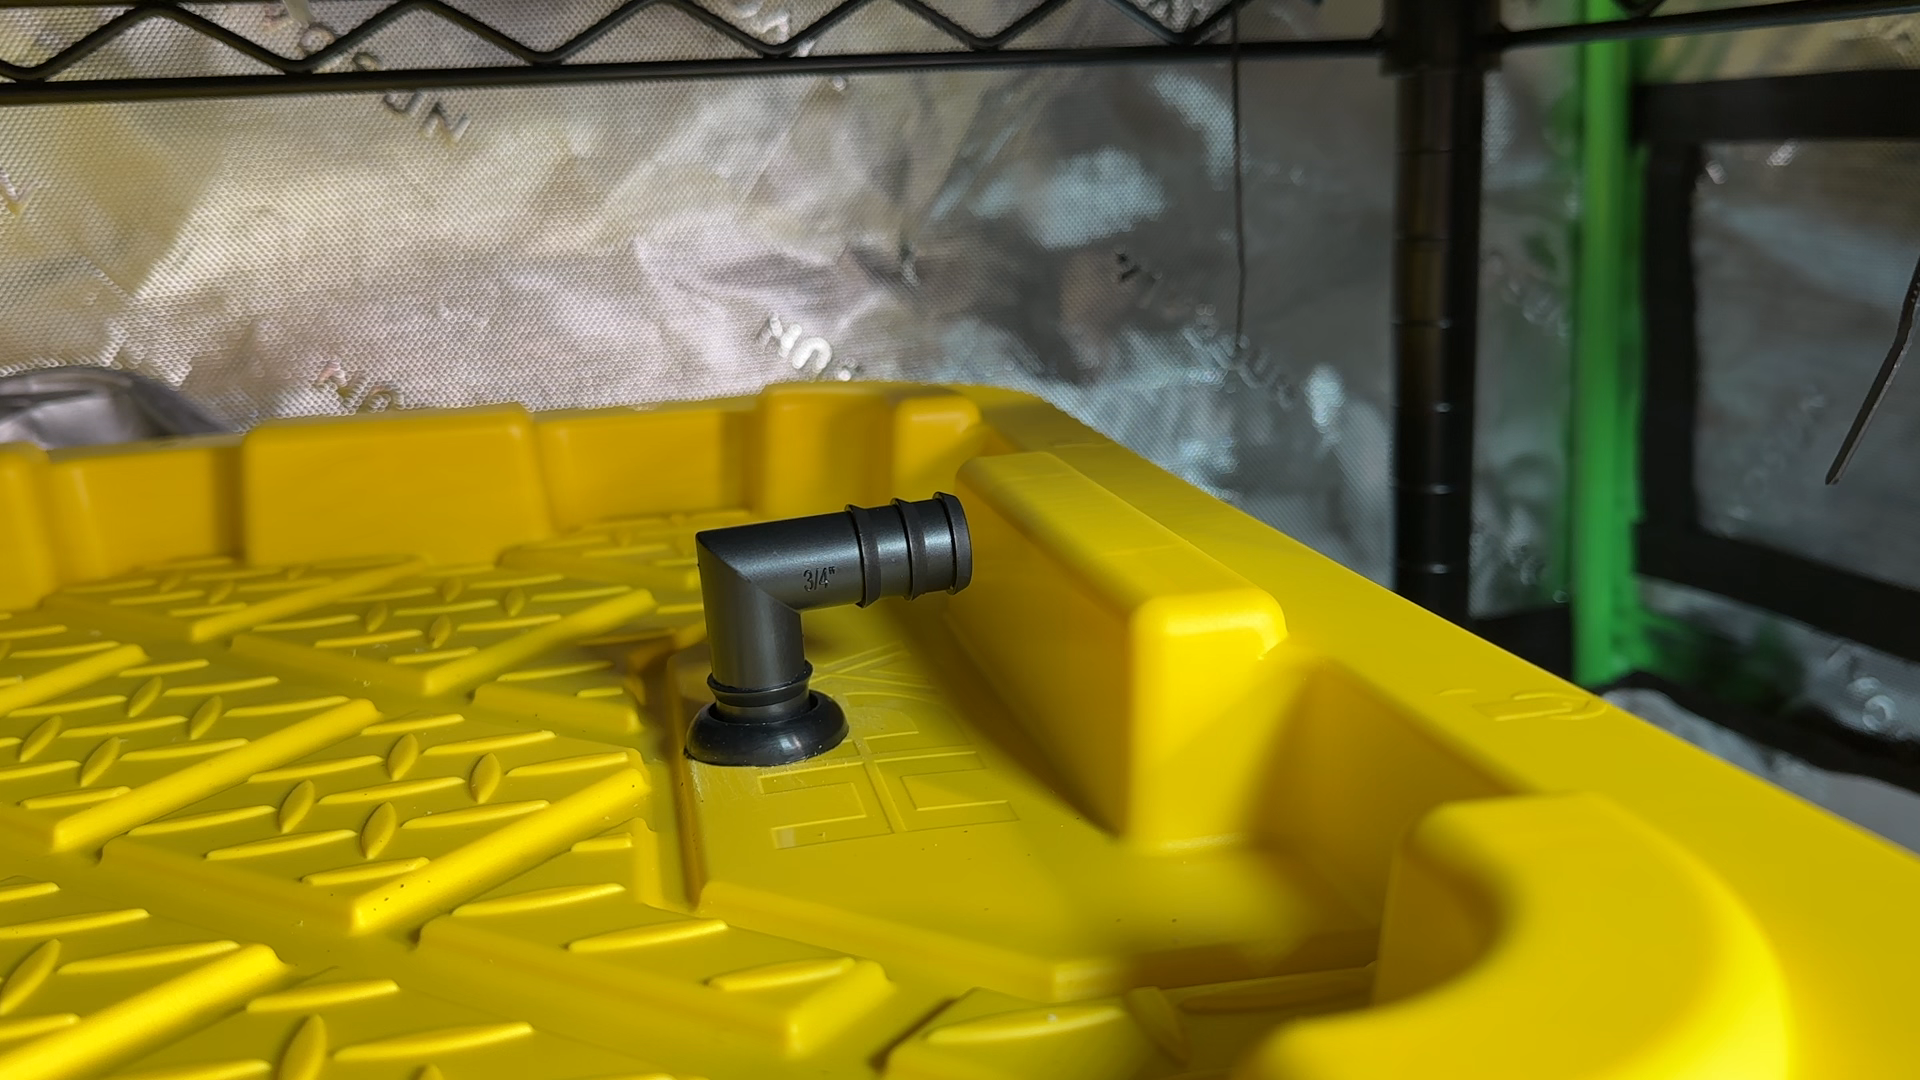
The elbows help you bend your hoses at extreme angles without kinks
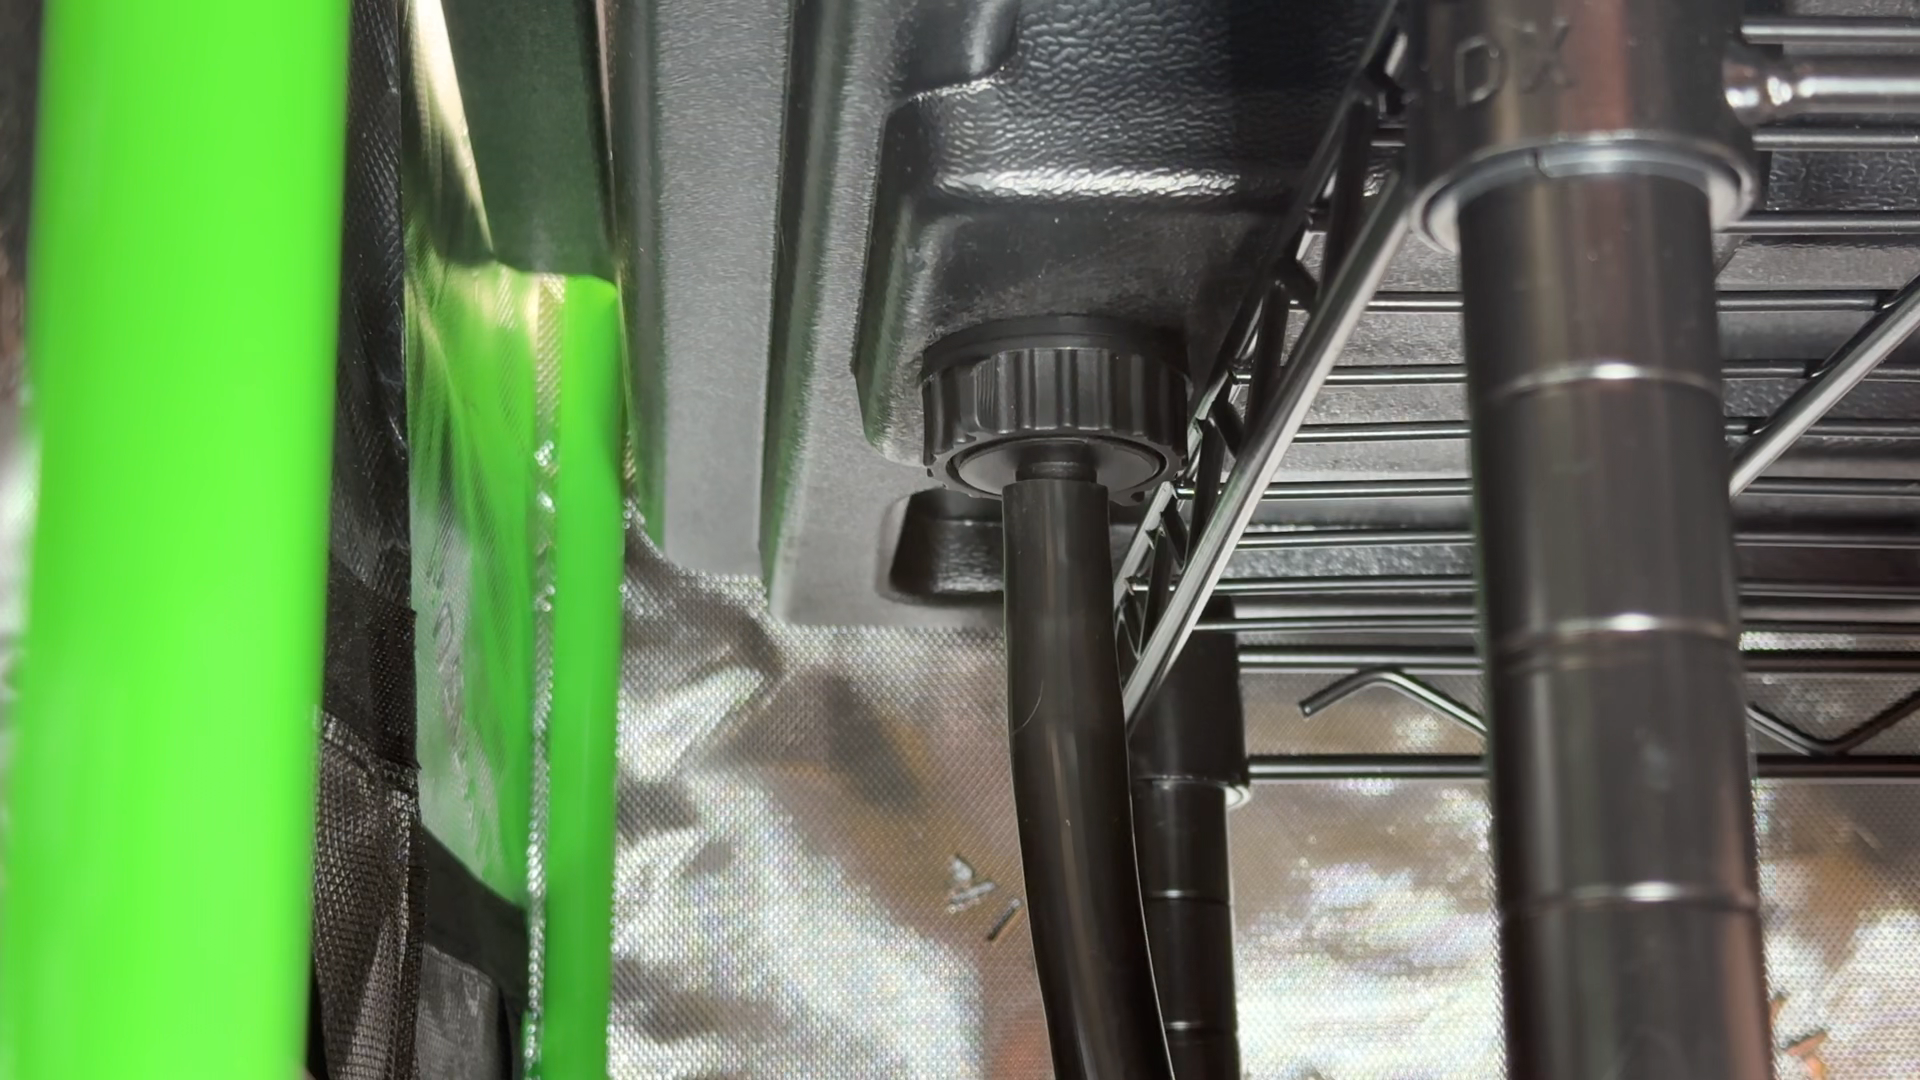
Hoses fit snugly on these barbs and are water-tight with no clamps or ties
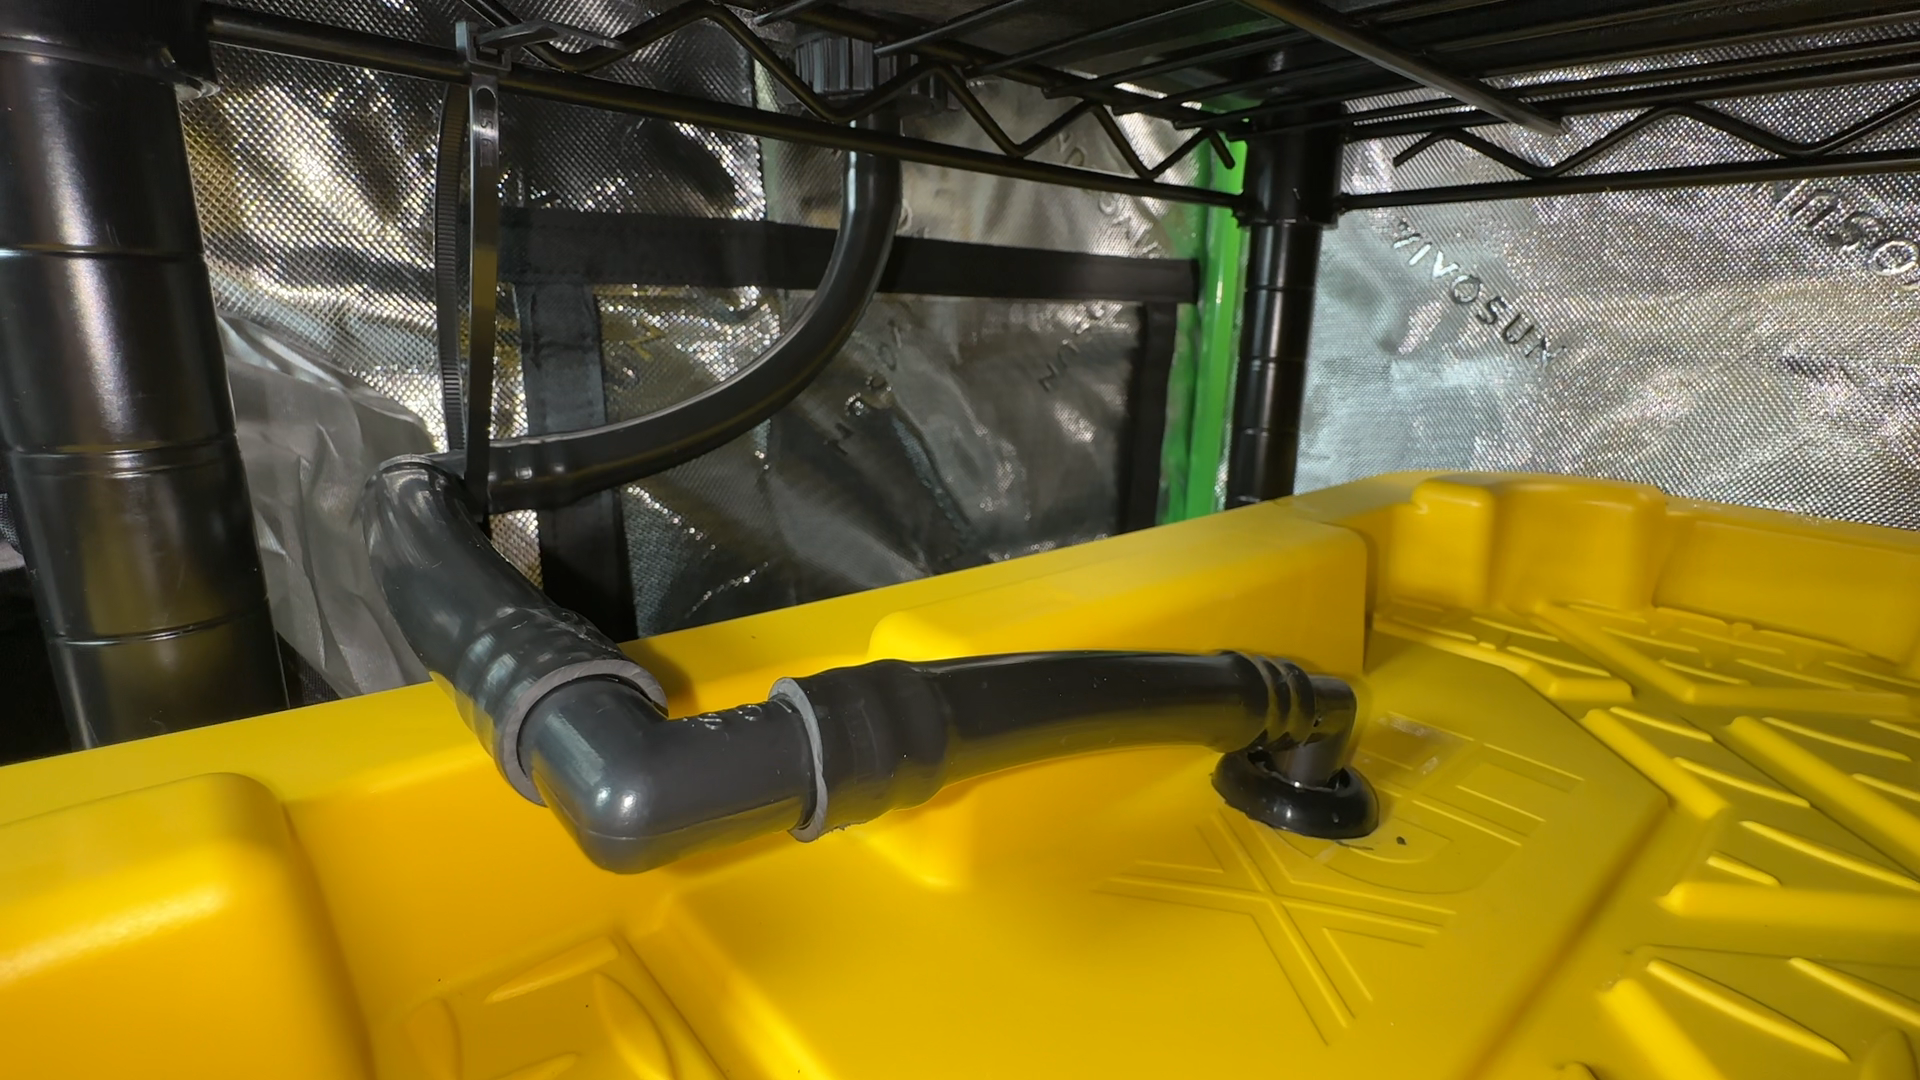
Multiple elbows can be used to make sharp turns, just make sure it flows
Step 5: Set Up the Timer for Flood Cycles
1️⃣ Plug the water pump into a programmable timer.
Set 15-minute flood cycles every 2-4 hours (adjust based on plant needs).
Start with two floods per day and increase as roots grow.
2️⃣ Monitor plant response and tweak the schedule.
Too much flooding? Reduce time.
Roots drying out? Increase frequency.
Step 6: Adjust for Different Tent Sizes
✔ For a 4x4 tent: Use a larger flood tray (3x3 or 4x4) and increase the reservoir size to 30-50 gallons.
✔ For a 2x2 tent: A 1x2 or 2x2 tray with a 10-gallon reservoir is more suitable.
✔ For custom setups: Modify the table height, flood tray, pump size, and flood cycles based on your plant needs.
Pro Tips for the Best Ebb & Flow Setup
🔥 Use dark tubing to prevent algae growth inside water lines.
🔥 Attach PVC pipes under the tray to stabilize it and extend its width.
🔥 Keep the reservoir covered to reduce evaporation and prevent contaminants.
🔥 Drill valve holes near one end of the tray for easy water return.
🔥 Check pH and EC daily for nutrient balance.
🔥 Use a check valve on the air pump if it's positioned lower than the reservoir.
🔥 Test flood times before adding plants to avoid over/underwatering.
Watch My Full Setup Video! 🎥
For a full step-by-step video of how I built this exact setup, check out my YouTube video where I show the entire process and explain why I chose each component.
Got questions? Drop a comment below or hit me up on Discord!